Home |
Community |
Forms |
Pictures |
Procedures |
- - - - - - -
- |
- - - - - - -
- |
Mark's KLR650 Site Has Moved! *** This is old and outdated Information *** Please click the following link and change your bookmark to: ---------------------------------
|
| VISTA-CRUISE THROTTLE LOCK INSTALLATION |
| This is a relatively straight-forward procedure, but can be difficult to visualize if you've never seen or used a throttle lock. With the following pictures and accompanying text installation should be easily accomplished in 1/2 hour or less. |
| |
| This throttle lock is a great thing for long distance traveling, and although you can over-ride it by just twisting the grip with extra force when it's engaged, it definitely should NOT be used in traffic. |
| |
| The lock is available from Fred Hink at Arrowhead Motorsports: http://www.arrowheadmotorsports.com under KLR / Control. The part # is 12-7130. |
| |
| |
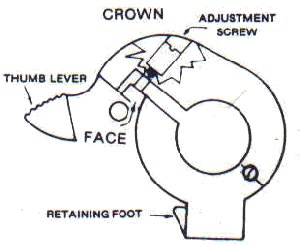
| The diagram above is of the throttle lock, taken from the back of the package. |
| |
| Installing Vista-Cruise with Acerbis guards: |
| Thanks to Stu Mumford for his information on installing the Vista-Cruise with Acerbis guards. Following is his reply to a list question, (used with his permission): |
| I
installed the VC on the plastic, sandwiched between the end of the grip
and the end of the plastic throttle tube. To prevent the VC from spinning,
I drilled a tiny hole in the throttle cable housing, inserted a small
self tapping sheet metal screw to secure the "feet" on the stationary
part of the VC to the throttle cable housing. After rotating the throttle
through its full range several times to make sure that there was no binding
on the throttle cables, I put a dab of silicone on the screw to make the
whole installation weather and dirt-proof. Works perfect. I run Renthal Desert Bends, Pro-Grip gel grips, Acerbis Rally Pro handguards, and the Universal Vista Cruise. |
| |
| |
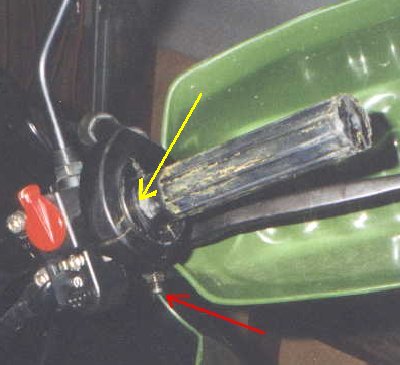
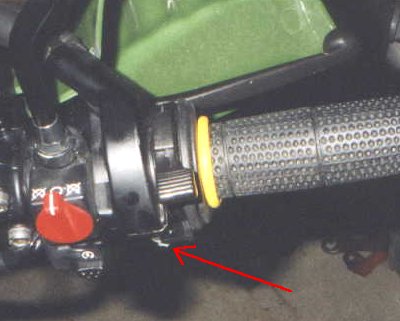
| The picture above shows the start of the throttle lock installation. The throttle lock goes at the far left of the throttle sleeve, right up against the flange, slotted tab facing toward the kill switch - (location shown by the YELLOW arrow.) The grip was removed because the original installation was badly done, and needed to be re-glued, and may not be necessary. The throttle lock can be taken apart by unscrewing the cylindrical brass "nut" with the key included with the throttle lock, and slipped over the throttle sleeve if you want to try installation with the grip still in place. The RED arrow shows the location of the retaining screw, discussed later on. |
| |
| |
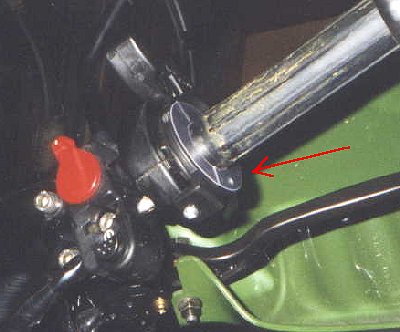
| The picture above shows that the throttle lock is assembled on the throttle sleeve, with the RED arrow pointing to the anti-friction washer. It is very important that this be installed as it provides a free moving surface between the throttle lock and the rubber grip - otherwise the throttle action would be "sticky." |
| |
| |
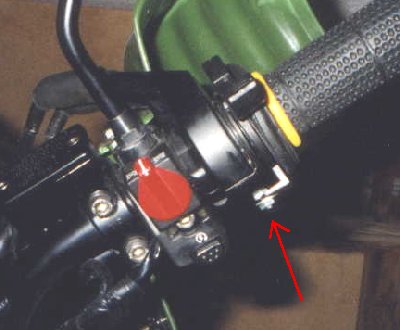
| The picture above shows the throttle lock installed, with the grip back in place. The RED arrow points to the lock retaining stud. You have a couple choices here: you can drill a small hole in the bottom of the throttle cable housing, and install a small screw to hold the tab of the throttle lock in place. The alternative - shown above - is to mark the location where the retaining stud should go, and remove the bottom of the throttle cable housing. Drill a hole, and install a small bolt with the head inside the housing. Thread on a nut from the outside to hold the bolt in place, move the throttle lock tab into place, and install a washer/nut to secure the tab. NOTE: The head of the bolt must be very thin, or ground down so as to not interfere with the operation of the throttle cables in the housing. This is also true of a screw used from the outside - don't screw it in too far. Be sure to test throttle lock positioning before you drill the hole! |
| |
 |
 |
|
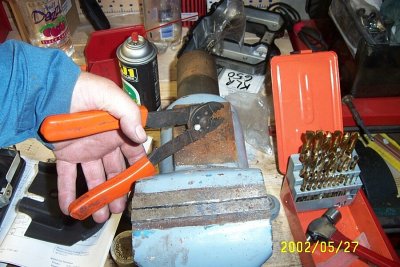
Thanks to Dan, motorcycle_dan@yahoo.com, for the above photos. Here's what he had to say:
I didn't think the lever stuck over far
enough over the throttle housing. I used a small scrap of heavy gage
stainless sheet metal. Drilled one hole so a 6-32 screw would fit loose
then tapped a 6-32 hole into the throttle housing. If
you are like everyone else. Screw the screw in to the depth you
want. Lay the crimping pliers on something solid. Whack
the snot outta it with a heavy hammer. Hopefully one HARD blow will
shear it off. If you installed it from the correct side, as you
back out the screw it will straighten any thread that may have been
damaged in the break off process. |
| |
| The final step is to
fine-tune the installation. Tighten the brass adjustment "nut"
until the thumb lever is snug (not tight) against the face of the crown.
Turn the grip about 1/4 turn and depress the thumb lever to the ON position,
and release the grip. If the lock fails to hold the grip in the set position,
tighten by 1/4 turn increments until the lock holds the throttle setting.
It's important to not over-tighten! Check the Vista-Cruise in the OFF, or UP postion of the thumb lever. You should be able to twist to fully open throttle, and have it spring back to closed when the grip is released. If this does not happen, loosen the adjuster, and/or check for binding between the lock and rubber flange of the hand grip. |
| |
| |
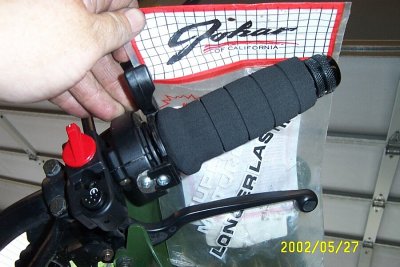
| The picture above shows the throttle lock fully installed, and ready to use. The RED arrow is pointing to the retaining stud, which is just forward of the center of the bottom of the throttle cable housing. The thumb lever with horizontal lines on it, is just above the red arrow. The throttle lock is shown in the inactive position. Open the throttle to whatever position/speed you want, and push the thumb lever down to lock the throttle at that speed. |
| |
| NOTE: This is NOT cruise control. The bike will slow down going up hills, and speed up going down them. It works best on flat ground. |
| NOTE: The grips shown are the Pro Gel Grips, also available from Fred Hink at http://www.arrowheadmotorsports.com These grips are a huge improvement over stock, and greatly increase hand comfort. |
| The yellow O-Ring is CAT part # 8M4991, and was intended as a poor mans throttle lock. Unless you have superman fingers, or bar ends, this is NOT the way to go! |