Home |
Community |
Forms |
Pictures |
Procedures |
- - - - - - -
- |
- - - - - - -
- |
Mark's KLR650 Site Has Moved! *** This is old and outdated Information *** Please click the following link and change your bookmark to: --------------------------------- |
DASH
INSTALLATION OF A 12 VOLT WATERPROOF OUTLET |
The
12v outlet came from Fred at Arrowhead
Motorsports, the accessory fuse kit came from Tammy at DualSportRiders,
and the mini sport dash came from Chris at Big
Cee Engineering. |
There
are a number of uses for an outlet like this; GPS, air compressor,
cell phone charger, etc. I installed the outlet in a way that
works best for me. As is the case with all the procedures here,
you can do it my way, or you can use this information to guide
you on your own path. |
| |
 |
|
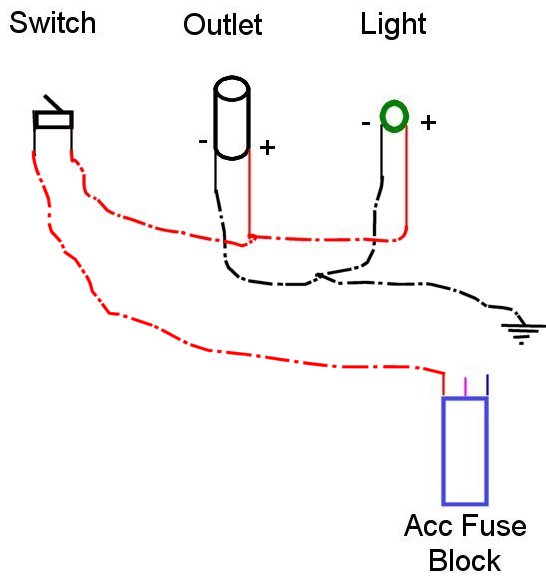
| The diagram and picture above should help you to correctly wire the components. I wanted my outlet mounted up behind the fairing for some extra protection and for convenience. It comes with a bracket that would allow you to mount the outlet pretty much anywhere. The outlet required a 1 3/32" hole, which I was able to easily drill with a borrowed unibit. If you decide to use a switch and indicator light as I've done, the size of the holes will depend on the size of the switch and light bodies. I used a dremel with a cutting wheel to make the small notch that's required for the placement tab on the side of the outlet. You can just make it out on the right side of the outlet, down at the dash. I used a sticky plastic base with the tab that's meant for a zip-tie to hold the wiring in place at the switch. I used 12 gauge stranded wire that I had on hand, but you can safely use 14 gauge. Here's the basic story
|
*
Run a positive (+)
wire back to Tammy's Accessory
Fuse Kit, or to the battery. If you go to the battery,
you'll have to add an inline fuse. The instructions that came
with the Arrowhead waterproof 12v outlet suggest a 10amp fuse. |
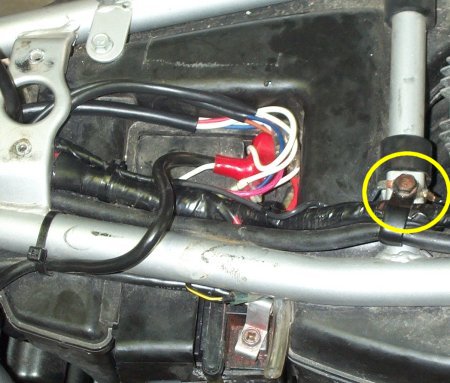 |
* Run a negative (-) wire to a good ground of your choice. The image above shows, in the yellow circle, that I've got the ground from that bolt going into the frame. I stretched out both the positive and negative wires, wrapped them in good quality 3M electrical tape and ran them back to this location under the saddle. I'm using Tammy's Accessory Fuse Kit so all I had to do was bolt down the negative wire, and plug in the positive. Don't actually make the final connections at the accessory plug or battery until you're done with all the wiring. |
 |
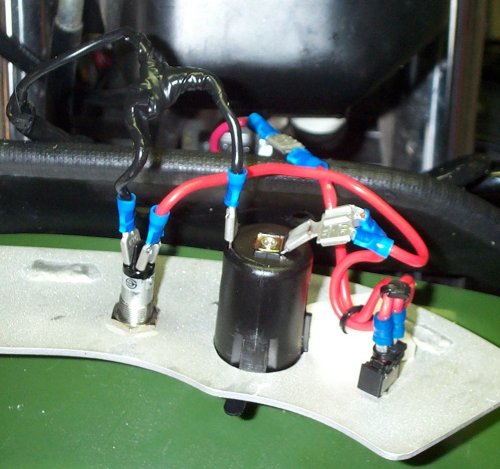
The
picture above gives an idea of what you should have, pretty much
whether you choose a dash or bracket mount of the outlet. I used
removable connectors so that the dash & outlet could easily
be removed, if necessary. |
*
The incoming positive (+) wire goes to one terminal
on the switch. |
* The incoming negative (-) wire needs to ground both the negative side of the outlet and the negative side of the light. I soldered together a Y shaped wire connector, as shown in the picture under the diagram. I put connectors on all three ends, connected the "leg" of the Y to the incoming negative wire, and the two other ends to the light negative and outlet negative. |
* A positive (+) wire now needs to come from the remaining terminal on the switch to the positive side of the outlet, and the positive side of the light. I used a 1-into-2 connector on the positive (+) terminal of the outlet. The positive wire comes from the switch to one side of the 1-into-2 connector on the outlet, and the other side goes to the positive on the light. |
Make
the final connections for ground and/or power, and you should
be good to go. |
 |
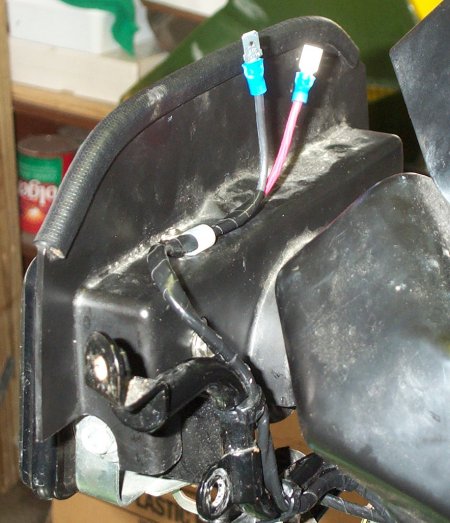
| The above picture shows the finished installation. Green means go! The Big Cee minidash was a perfect fit with the stock windscreen, but needed tweaking to work with my Clearview 11+. |