Home |
Community |
Forms |
Pictures |
Procedures |
- - - - - - -
- |
- - - - - - -
- |
Mark's KLR650 Site Has Moved! *** This is old and outdated Information *** Please click the following link and change your bookmark to: ---------------------------------
|
|
| FORK OIL CHANGE | |
| * | Front end off the ground. You absolutely must raise and block up the bike so the front wheel is off the ground if you want to remove and service both forks at once. (You can leave the wheel on, and do one side at a time, but I've never done it this way.) |
| * | Remove the brake caliper & brake line mount from the left fork, and the speedometer cable mount from the right fork. |
| * | Remove front wheel (See the note above) |
| * | Loosen the fork caps by a few turns, but to avoid a possible mess leave them on until the tubes are off the bike. |
| * | Loosen upper triple clamp fork pinch bolts. NOTE: You’ll probably have to insert a screw driver into the triple clamps to open them up a bit to help the tubes slide out. Mark or measure where your tubes are in the triple clamps so that when you reinstall them you put them back to the same height as they were before. |
| * | Loosen lower bolts, and remove forks from triple clamps. Be prepared to hold the forks once the lower bolts are loose because the forks may be able to slide through the clamps without the clamps being pried open first. |
| * | Remove the fork top caps. |
| * | Remove the spring, being prepared for the mess it will make when it comes out dripping oil. |
| * | With the fork off the bike, it’s obviously not necessary to use the drain screws. Tip the fork over into a container to catch the oil. Pump the fork up and down by hand into the container again to remove as much oil as possible. |
| * | Let the fork tubes drain for at least 2 hours, you'll be surprised at how much more fork oil will come out. |
| * | [Optional] Partly refill each fork with some fresh fork oil, pump the forks a few times and drain again to flush out remaining rubbish. ATF has also been suggested for this gunk removal step, just be very sure to use plenty of fork oil afterwards to remove all traces of it. |
| NOTE: Since you’re this far into it anyway, you might want to consider replacing the OEM fork boots, if you haven’t already. They’re not known for long life, and are important for fork protection. Consider Daystar #58 boots, which are available in a number of colors. www.arrowheadmotorsports.com or Email Fred Hink at: fred@arrowheadmotorsports.com |
|
| For a 2001 KLR650 (A15), the recommended levels and specifications are: |
|
| Changing oil: 355mL | |
| Disassembly and completely dry: 420 +/- 4mL | |
| Oil rating: Kayaba G-10 | |
| Viscosity: SAE 10W20 | |
| Fork oil Level: 190 +/- 2mm below the top end of the inner tube | |
| NOTE: The weight specification comes from the service manual, and is apparently only sold as an "official" Kawasaki item. I use PJ1 Fork Oil, and have chosen 15 H.V.I. as the right weight for my style of riding. | |
| WARNING: As stated by the manual: The operation of an air front fork is especially dependent upon correct oil level. Higher level than specified may cause oil leakage and seal breakage. Be sure to maintain the specified level. |
|
| * | I assume that after the forks are drained they will require at least the 355mL of fork oil recommended for simply changing, so I dump that into each tube using a Pyrex measuring cup that's marked in mL. |
| * | Now that there is fresh fork oil in the tubes, I like to use the ZIP-Tie dowel for measuring to make sure I have exactly the right amount. Remember, this measurement is taken with the springs out, and the forks fully compressed. |
| * | Once the fork oil level is correct, it's time to screw the caps back on. I prefer to get the caps partially threaded into the tubes while the forks are still off the bike. Since cross-threading will ruin the day, I think this method gives me a better sense of how the cap is threading into the fork tube. Doing this by hand - NO TOOLS - will pretty much avoid any problems. |
| * | Re-install the forks in the clamps, at this time tightening only the lower clamps. |
| * | Re-install the wheel, brake caliper & brake line mount from the left fork, and the speedometer cable mount from the right fork. |
| * | Get everything lined up, and correctly placed. Be sure to return the fork tubes to their original position in the clamps. Tighten all clamps. |
| Refilling Suggestions: |
|
| Get a measuring cup that reads in milliliters, fill it to the specified amount and dump it into the fork tube. (Drain plug installed, spring out, fork compressed.) Measure to be sure you’re at the right level. |
|
| Get the pump and plastic tube from any spray bottle. Clean it for use by sticking the tube into a container of fork oil and pump the sprayer until clean, uncontaminated oil is coming out. Cut the tube to the length you want; for example, 190mm, (19cm.) Fill the fork tube with fork oil, (Drain plug installed, spring out, fork compressed), put the plastic tube into the center of the fork and pump until no more oil comes out. Be sure the plastic tube is perfectly straight, otherwise your measurement will be off! |
|
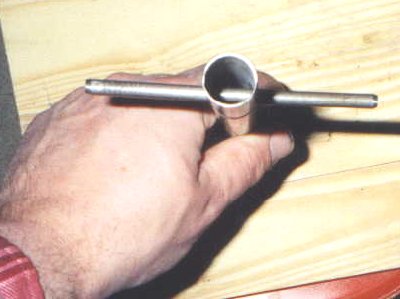
| Use a small dowel with a zip-tie on it at about 250mm, (25cm), from the end, and a notch 190mm, (19cm), down from the zip-tie. Stick the dowel into the fork until the zip-tie touches the top of the tube, the notch is the Full mark. NOTE: To avoid displacement of the oil, and an inaccurate measurement, this should be a VERY small diameter dowel, or perhaps better yet, a thin-walled pipe such as conduit. I use this method with 1/4" conduit. |
|
| |
|
| |
|
| Make sure to drill the hole through the tube perfectly level, or the measurement will be off. The score near the bottom of the tube, which is the actual measuring mark, was made with a tubing cutter. | |