Home |
Community |
Forms |
Pictures |
Procedures |
- - - - - - -
- |
- - - - - - -
- |
| Mark's KLR650 Site Has Moved! *** This is old and outdated Information *** Please click the following link and change your bookmark to: ---------------------------------
|
| RAMP LOADING OF THE
KLR |
I've had a few questions concerning loading and transporting the KLR in a truck. I've posted a few pictures here, and included text that I think will help out.
|
There
are numerous ways to do this, as with pretty much anything. This
will show how *I* do it, and you can take it from there. |
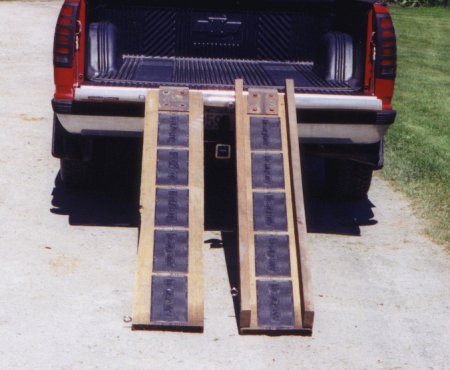 |
| The picture above shows the ramps set up on the tailgate of my truck, and ready to go. I used two 2x12 pressure treated boards for the ramps, and to the one shown on the right, screwed two 2x4's on edge along the whole length of the ramp. This keeps the tires from wandering off the side. Each ramp is 6 feet long. I had the maintenance shop at work make the ramp ends for me, but they are readily available from places such as J.C. Whitney. [RAMP ENDS] Also, you'll notice the traction pads screwed to the surface of both ramps. These keep the bike AND me from slipping going up or down. These may be available elsewhere, but I got them at J.C. Whitney. [TRACTION PADS] |
 |
|
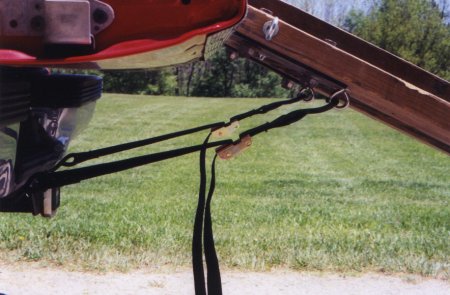
The above picture shows the use of tie-down straps to hold the ramps
"into" the tailgate. *I* think this is a very important thing,
as it prevents the ramps from kicking out or being knocked off / sideways.
I just screwed a couple heavy eyebolts to the underside of the ramps,
and ground off what little came through the top side. |
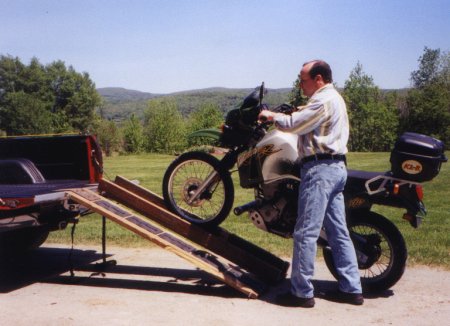 |
| The picture above shows me just starting the bike up the ramp. I just start the bike, put it into first, and work the throttle, brake and clutch to walk it up. |
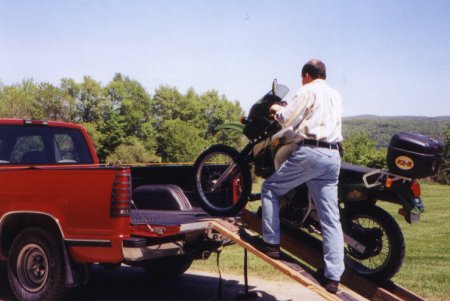 |
| The picture above shows the bike almost in the bed. This is really an easy method of loading. My shoulders and knees aren't all that great, so this just about the only way I could get the bike into the truck without killing myself. |
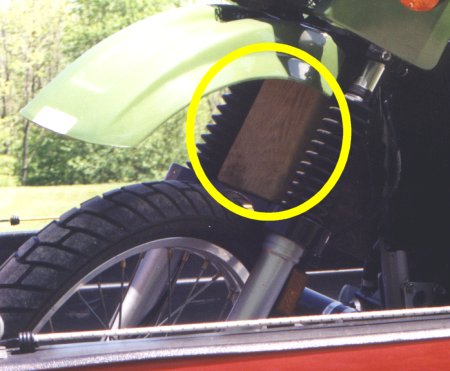 |
| The picture above shows a 4x4 block set between the Superbrace and the top of the fender. I've read that it may be possible to strap down the front end so much that after bouncing around for a while in that position, the fork seals may blow. I don't know if this is a valid concern or not, but using the block couldn't hurt. I have stock springs, with the fork tubes mounted flush with the top of the clamps - for me, 8" was the right length for this block. |
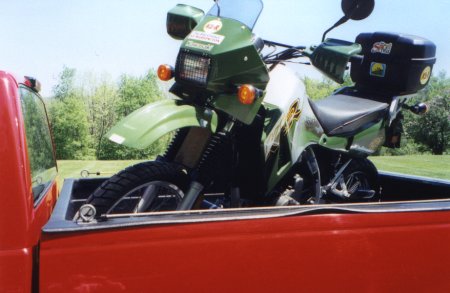 |
| The bike is loaded, and the tailgate is up. This truck has a 6' box, so I just kick the back end of the bike around, making it corner to corner. The tailgate shuts with a little room to spare. I'll use motorcycle tie-downs to all four corners, throw in the ramps and cable lock them to the eyebolts of the truck. |