Home |
Community |
Forms |
Pictures |
Procedures |
- - - - - - -
- |
- - - - - - -
- |
Mark's KLR650 Site Has Moved! *** This is old and outdated Information *** Please click the following link and change your bookmark to: ---------------------------------
|
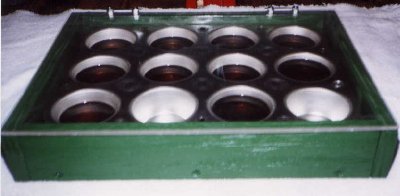
| SHIM STORAGE CASE |
| I guess this shim storage case is a project for the truly bored, but it IS an excellent way to keep your shims protected, and ready for use. Materials are cheap and readily available, probably stuff you already have laying around the garage or workshop. As with most things, this is just one way to do it... |
| |
| Materials: 3/4" plywood, galvanized deck screws, 12 cup aluminum muffin tin, 2" hinges with screws and bolts, plexiglass for the top, sandpaper, and whatever color paint you want. Since this will be for servicing my A15, green for the wood seemed appropriate, the muffin tin is already silver. Yeah, sometimes it's hard being me! ;-) |
| |
| |
| Here's the storage case with the plexiglass cover closed. |
| I bought the muffin tin at Wal-Mart, and their 12 cup size measures 13 13/16" x 10 3/8". With those dimensions in mind, here a list of the pieces to cut: |
| 1 BASE: 14" x 10 1/2" |
| 2 "LONG" SIDES: 14"(Long) x 3"(Tall) Initial => 2 1/2"(Tall) Final |
| 2 "SHORT" SIDES: 11 7/8"(Long) x 3"(Tall) Initial => 2 1/2(Tall) Final |
| 1 PLEXIGLASS TOP: 15 1/2" x 11 7/8" |
| |
| NOTE: The base (14" x 10 1/2") is the correct size for the muffin tin to just sit on with only the slightest space around it. The sides must be fastened to the edges of the base, not the surface. (Note the screw holes in the pictures.) |
| NOTE: The sides are cut 1/2" taller than the finished case should be. I do this because the way plywood is contructed sometimes causes screws to wander, which can result in an uneven assembly. The final wood cutting step is to set the saw fence at 2 1/2," and cut down all 4 sides. This creates a perfect surface for the top to rest on. |
| |
| |
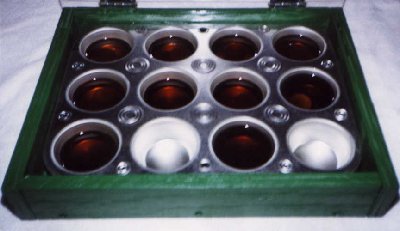
| Here's the storage case with the plexiglass cover open. |
| Once the basic box is assembled, lay the plexiglass on top. I set the hinges about 2" in from the sides, but do it however it looks best to you. Mark and drill the holes for the hinges, allowing the drill bit to mark the top of the plywood underneath. |
| You can bolt the hinges to the top, bolt heads down on the plywood side, and up through the plexiglass with the nuts on top. |
| You can use an appropriately sized router bit, plug cutter, oversize drill or whatever else to make the 4 "holes" on the edge of the plywood that each bolt head will live in when the cover is closed. |
| Next, lay the cover back on the box and screw in the 4 screws holding the hinges to the sides of the box. |
| Remove the side hinge screws - (yes, you did just put them in) - and set the cover in a safe place where it won't get covered with dust or paint. |
| Now, with all the holes drilled, and everthing done to the wood that's going to be done to it, get busy with that sandpaper! Make sure to clean all the sawdust off when you're finished. |
| Finally, paint the box. I used Hunter Green latex spray paint, and set the box up on two coffee cans so I could easily get the sides and edges. When everything is painted that can be "reached," flip the box over and paint the rest. Plywood is fairly absorbant, it took 4 coats to produce a finish that I found acceptable. |
| Once the box is completely dry - give it at least 24 hours after the final coat with latex, and longer with an oil-based paint - screw the cover hinges back in place, and drop in the muffin tin. |
| You can fill all the cups if you start with 2-30 and finish with 2-85 shims. Fill each cup about 1/2 to 3/4 full with clean oil, I haven't determined if it should be Mobil 1 or not ;-), clean the shims of any of the protective coating they come shipped with, and drop them by size in each cup with the numbers facing UP. You can easily see the shim size through the oil. They're clean, pre-oiled and ready to drop in! |